Quick answer
If your AM5 PC takes much longer to boot after enabling AMD EXPO, memory initialization and training are among the first things to investigate.
EXPO applies an overclocked DDR5 memory profile. After changing memory settings, the motherboard may spend additional time initializing and training the memory before it can continue through the normal boot process.
A long boot immediately after enabling EXPO does not automatically mean something is wrong. But if every boot remains unusually slow, check your BIOS version, RAM configuration, motherboard memory support and available memory-training options before assuming the hardware is defective.
You enable EXPO, save the BIOS settings and restart.
Then something strange happens.
The PC powers on, but instead of reaching Windows quickly, it appears to sit there doing almost nothing.
You may notice:
- a black screen before the motherboard logo
- the DRAM debug LED staying on
- fans spinning normally
- a much longer POST time
- occasional automatic restarts
- Windows eventually loading normally
- subsequent boots still taking longer than before
The confusing part is that once Windows finally loads, the computer may work perfectly.
If that describes your PC, the delay may be happening before Windows even starts.
EXPO changes how your memory operates
AMD EXPO stands for Extended Profiles for Overclocking.
It provides predefined memory profiles designed to make DDR5 memory overclocking easier on supported AMD Ryzen systems.
When EXPO is disabled, your RAM may operate using more conservative default settings.
After enabling EXPO, the system may attempt higher memory frequencies, different timings and other profile parameters.
That means the motherboard has a different memory configuration to initialize during startup.
And before the system can boot normally, that configuration has to work reliably enough for the motherboard to continue POST.
What memory training means
Modern memory systems require initialization during startup.
A simplified way to think about memory training is:
motherboard powers on → memory is initialized → the system determines working memory parameters → POST continues → operating system starts
When the memory configuration changes, the initialization process can take longer.
This is especially noticeable after:
- enabling EXPO
- changing memory frequency
- changing memory timings
- changing DIMMs
- resetting BIOS settings
- updating the BIOS
During this stage, the PC may look frozen even though the motherboard is still working on memory initialization.
That is why immediately turning the PC off can be misleading.
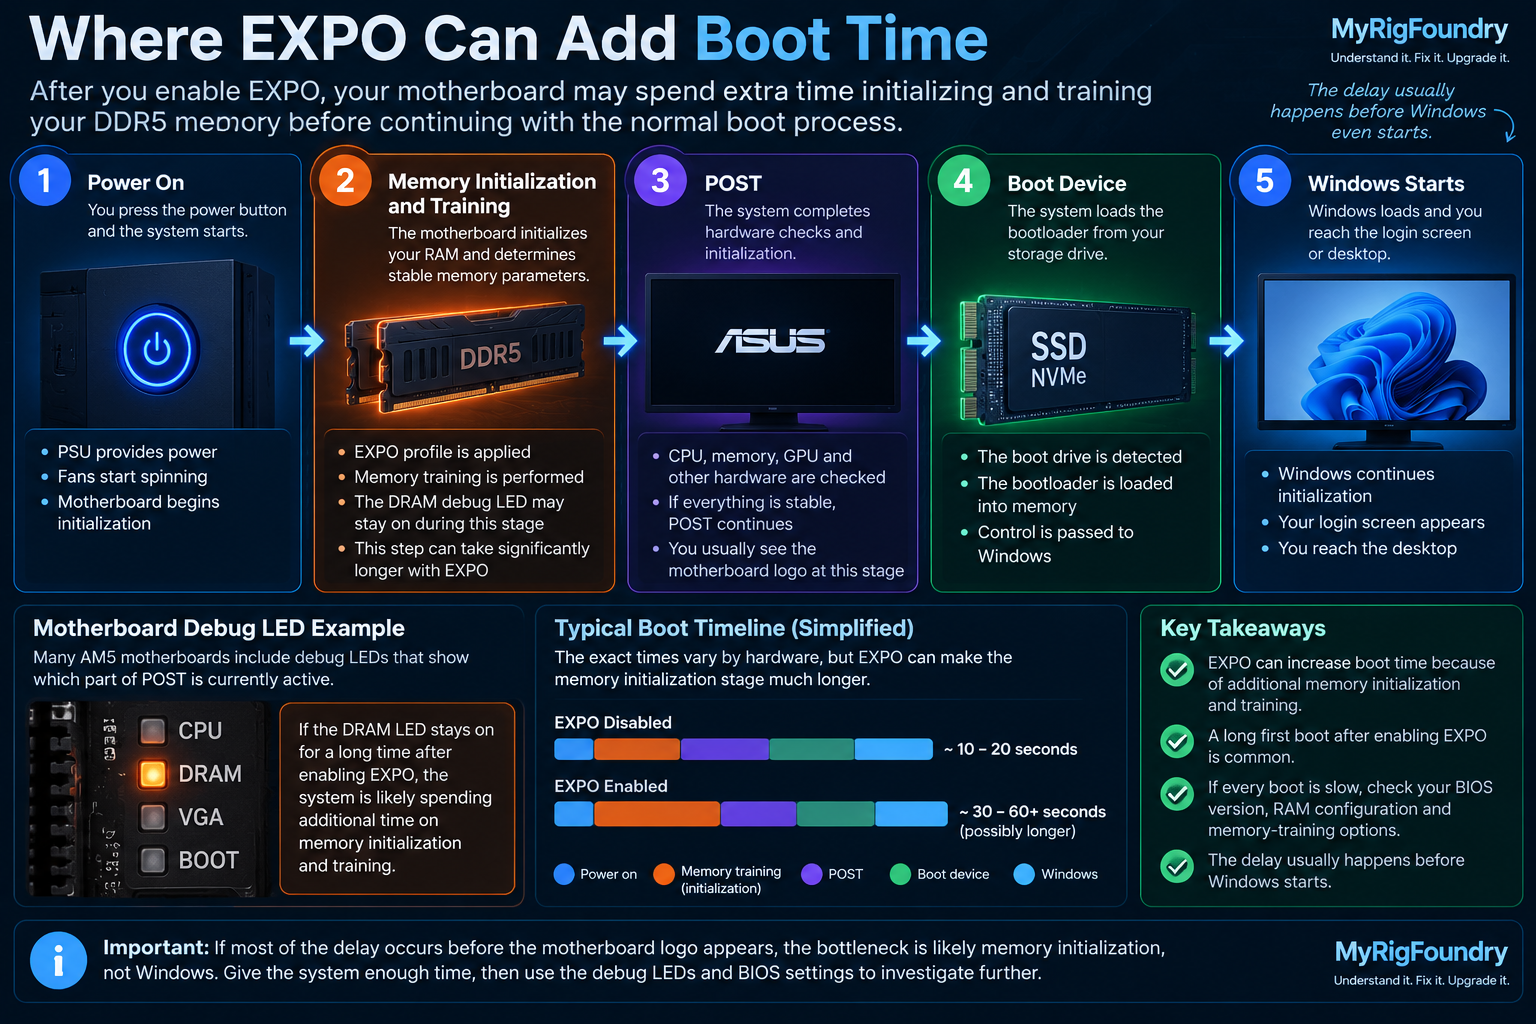
First boot after enabling EXPO can be different
The first boot after changing memory settings deserves special attention.
If your PC normally reaches the motherboard logo quickly but takes much longer immediately after enabling EXPO, give it time.
Watch the motherboard’s diagnostic indicators if available.
The DRAM light may remain illuminated while the memory subsystem is being initialized.
If the system eventually continues and reaches Windows, that is very different from a system that never completes POST.
The first question should therefore be:
Does it eventually boot?
If yes, continue investigating boot time and stability.
If no, you are dealing with a different problem.
Long first boot vs slow boot every time
This distinction is extremely important.
Long first boot
The PC takes much longer immediately after:
- enabling EXPO
- changing RAM settings
- updating the BIOS
- resetting BIOS settings
but later boots become significantly faster.
That behavior is consistent with additional initialization occurring after the configuration change.
Slow boot every time
The PC spends a long time before POST on every startup.
That deserves further investigation.
The system may be repeating memory initialization work rather than reusing previously established parameters, or the current memory configuration may simply require more startup time.
Do not assume that both situations have the same cause.
Measure where the delay actually happens
Before changing BIOS settings, determine where the extra time occurs.
There are two very different possibilities:
Power button → motherboard logo is slow
or:
Motherboard logo → Windows desktop is slow
EXPO and memory initialization are much more relevant to the first situation.
If the motherboard logo appears quickly but Windows itself takes a long time to load, investigate Windows startup applications, storage and operating-system issues instead.
Use a timer if necessary.
Measure:
- power button to motherboard logo
- motherboard logo to Windows login
That simple test can prevent you from troubleshooting the wrong part of the computer.
Watch the motherboard debug LEDs
Many AM5 motherboards include diagnostic LEDs for components such as:
- CPU
- DRAM
- VGA
- BOOT
Watch them during the slow startup.
If most of the delay occurs while the DRAM indicator is illuminated, memory initialization becomes a much stronger suspect.
The DRAM light does not automatically mean your RAM is defective.
It tells you which stage of POST the motherboard is currently dealing with.
That distinction matters.
Compare EXPO enabled and disabled
A controlled comparison is one of the best tests.
First test:
EXPO enabled → measure boot time
Then return the memory configuration to its normal default settings and test:
EXPO disabled → measure boot time
If boot time becomes dramatically shorter with EXPO disabled, you have isolated the behavior to the memory configuration.
That does not mean EXPO is “broken.”
It means the system behaves differently while initializing the overclocked memory configuration.
Now you have something specific to investigate.
Check your BIOS version
Motherboard firmware plays an important role in memory compatibility and initialization.
Visit the official support page for your exact motherboard.
Check:
- your current BIOS version
- newer stable BIOS releases
- release notes
- memory compatibility improvements
- AGESA changes
- EXPO-related changes when specifically mentioned
Do not install firmware intended for a different motherboard model.
Even motherboards with very similar names can use different BIOS files.
If you decide to update the BIOS, follow the motherboard manufacturer’s official procedure.
BIOS updates can change memory behavior
Memory support does not remain frozen from the day a motherboard launches.
Firmware updates can include changes to:
- memory compatibility
- AGESA
- supported memory profiles
- memory performance
- memory initialization behavior
This is one reason two people with similar AM5 systems may report different EXPO experiences while using different BIOS versions.
But do not blindly update the BIOS just because booting is slow.
First identify your motherboard and current version, then read the relevant release notes.
Check your exact RAM configuration
Memory configuration can affect how difficult the memory subsystem is to initialize.
Record:
- exact RAM kit
- number of DIMMs
- capacity per DIMM
- total capacity
- EXPO speed
- motherboard model
- CPU model
- BIOS version
For example:
2 × 16 GB DDR5
is not the same configuration as:
4 × 16 GB DDR5
even though both involve DDR5 memory.
More modules and higher memory capacities can change the demands placed on the memory subsystem.
The exact configuration matters.
Check the recommended DIMM slots
If you are using two RAM modules, make sure they are installed in the slots recommended by the motherboard manufacturer.
The motherboard manual normally specifies which DIMM slots should be populated first.
Do not assume any two slots are equivalent.
Using the recommended configuration gives the motherboard the setup it was designed to prioritize for that number of modules.
Check RAM compatibility information
Identify the exact part number of your memory kit.
Then check:
- AMD’s memory compatibility information
- your motherboard manufacturer’s memory support list or QVL
A memory kit not appearing on a list does not automatically mean it cannot work.
However, compatibility lists provide useful evidence when investigating unusual behavior with memory overclocking.
This becomes particularly relevant when EXPO is the exact change that caused boot behavior to change.
Check whether the PC is actually stable
A PC that eventually boots but crashes afterward has a different problem from a PC that simply takes longer to initialize memory.
After Windows loads, watch for:
- game crashes
- application crashes
- freezes
- blue screens
- unexpected restarts
- memory-related errors
If the system is completely stable after startup, you may primarily be dealing with boot-time behavior.
If instability appears after Windows loads, investigate EXPO stability as well.
Check for Memory Context Restore
Some AM5 motherboard BIOS implementations provide a setting commonly called Memory Context Restore.
The exact name, location and behavior can vary by motherboard and BIOS version.
The purpose of this type of feature is to reduce repeated memory-training work during subsequent boots by reusing previously established memory parameters when appropriate.
If your motherboard provides it, consult the manual or official BIOS documentation for your exact board before changing it.
Do not copy settings from a random motherboard tutorial and assume your BIOS behaves identically.
If the setting improves boot time but introduces instability, return to the known-good configuration.
Stability is more important than saving several seconds during startup.
Do not change several memory settings at once
Slow AM5 boot discussions often lead to long lists of BIOS tweaks.
Avoid changing all of them together.
Do not simultaneously modify:
- Memory Context Restore
- EXPO profile
- memory frequency
- memory timings
- voltages
- memory power options
- training-related settings
If the boot suddenly becomes faster or unstable, you will have no idea which change caused it.
Use a controlled process:
baseline → one change → test → compare
That is slower for five minutes and much faster for actual troubleshooting.
Test a lower memory speed if necessary
If EXPO works but causes very long training or instability, a more conservative memory configuration can be a useful diagnostic test.
This does not mean you should immediately begin manually tuning dozens of timings.
The question is simply:
Does the system behave differently at a less aggressive memory configuration?
If yes, the memory configuration itself becomes more relevant.
If you are not comfortable manually tuning DDR5, returning to default memory settings while investigating the problem is perfectly reasonable.
Four DIMMs deserve additional attention
If you are running four DDR5 modules, mention that when seeking technical support.
Four-DIMM configurations can place different demands on the memory subsystem compared with common two-DIMM configurations.
Do not compare your boot time directly with someone using:
- a different CPU
- another motherboard
- another BIOS
- two DIMMs instead of four
- lower memory frequency
- a different memory kit
Their memory-training behavior may not represent yours.
Visual troubleshooting flow
Use this flow when EXPO works and Windows eventually loads, but POST becomes noticeably slower.
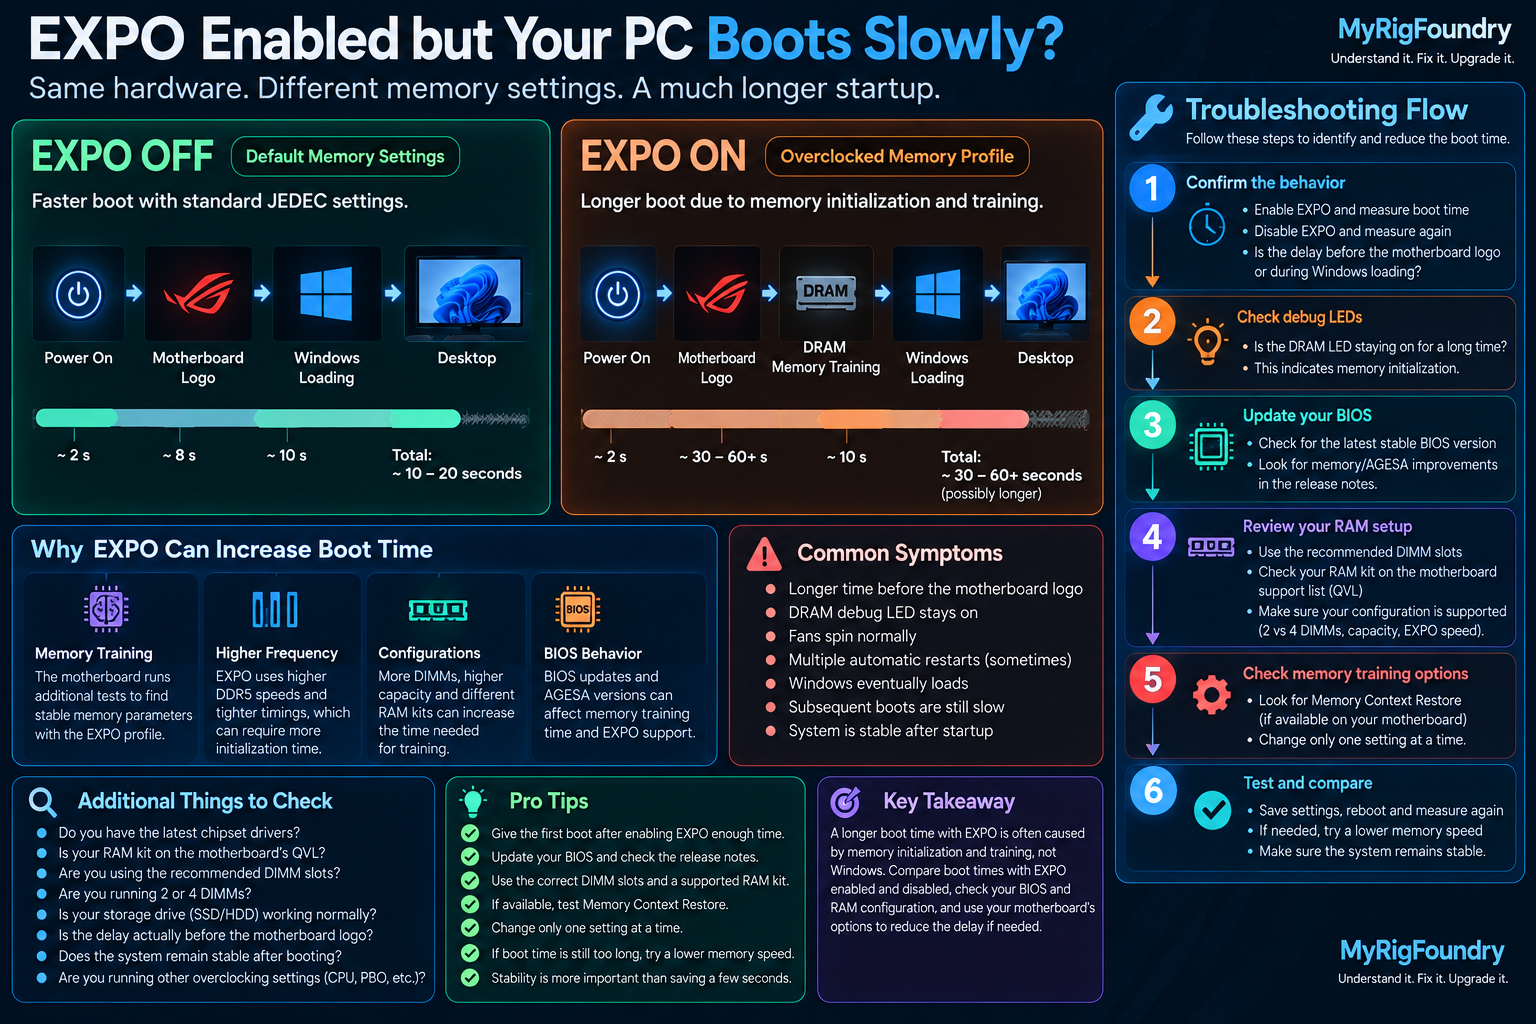
Do not assume a long boot means failed RAM
If the PC:
- eventually boots
- detects all installed memory
- remains stable in Windows
- only became slower to POST after enabling EXPO
then failed RAM should not be your first conclusion.
The timing strongly suggests investigating memory configuration and initialization first.
Hardware becomes more suspicious when problems also occur with memory returned to default settings.
When hardware becomes more suspicious
Investigate beyond EXPO if you see problems such as:
- boot failures with EXPO disabled
- memory errors at default settings
- missing RAM capacity
- one DIMM consistently preventing startup
- crashes at default memory settings
- the PC failing POST regardless of memory profile
At that point, the issue is no longer isolated to EXPO.
That changes the diagnostic path.
What not to do first
If EXPO makes your PC boot slowly, avoid immediately:
- replacing your RAM
- replacing the motherboard
- replacing the CPU
- repeatedly interrupting the first boot
- copying random memory voltages
- changing many BIOS options together
- assuming the DRAM LED means failed RAM
- reinstalling Windows
Windows may not even have started during the part of the boot process that is slow.
Find where the delay occurs first.
What to check first
If you want the shortest troubleshooting path, use this order:
- Determine whether the slow boot began after enabling EXPO.
- Give the first boot after the change enough time to complete.
- Measure power button to motherboard logo.
- Measure motherboard logo to Windows login.
- Watch the motherboard debug LEDs.
- Compare boot time with EXPO enabled and disabled.
- Confirm the PC is stable after reaching Windows.
- Identify your exact RAM kit, CPU, motherboard and BIOS version.
- Check that the RAM is installed in the recommended DIMM slots.
- Check memory compatibility information.
- Review relevant BIOS updates and release notes.
- Check your motherboard documentation for memory-training options such as Memory Context Restore, if available.
- Change only one BIOS setting at a time.
- Test a more conservative memory configuration if necessary.
- Investigate hardware only if problems also occur at default memory settings.
Important: If most of the delay occurs before the motherboard logo appears, Windows is probably not the first place to troubleshoot. Establish whether the motherboard is spending that time on memory initialization before changing operating-system settings.
The key diagnostic clue
The most useful comparison is:
EXPO disabled → fast POST
EXPO enabled → long DRAM stage → Windows eventually loads
That pattern points toward memory initialization rather than a generic slow-Windows problem.
Then determine whether the behavior happens:
only after changing memory settings
or:
on every single boot
That distinction tells you whether you may simply be seeing additional training after a configuration change or whether repeated memory initialization deserves further investigation.
Do not diagnose the RAM from boot time alone.
Use the entire pattern.
Official resources
- AMD — AMD EXPO Technology
- AMD — Ryzen Processor Overclocked Memory Compatibility List
- AMD — Socket AM5 Chipsets